Getting Stains out of Thrift Store Finds

Many an article on thrifting advice will advise you to skip the stained, torn, snagged, or otherwise damaged thrift find. In some ways, this makes sense – you shouldn’t let thrift prices (“But it’s so cheap!”) lure you into buying something that is poor quality or damaged beyond repair.

But stains, tears, and snags are often fixable. Can you sew by hand? Great, you can fix that hole in the armpit or along the side seam. Got a crochet hook (or a bobby pin or a tapestry needle)? Great, you can fix the snag in that sweater. Have a box of powdered oxygen bleach? Buh-bye, stains.

Which is what I’m going to show you today.

I present to you this lovely Y-neck tunic by Atmosphere:

IMG_20180210_162551295

It’s made out of the kind of high quality polyester that’s a decent dupe for silk; it drapes well; and it’s a good polished but not uncomfortable blouse for Sunday mornings (aka work).

It came with some sort of coffee-like stain on the hem, front and back:

Untitled design (2)

(It’s a little hard to see; one day I’ll learn to take close ups of stains before I fix them.) I figured someone had spilled on it, washed it, and then donated it when the stain didn’t come out of that first wash.

The Goodwill cashier very thoughtfully pointed out the stain to me and asked if I was sure I wanted to buy it; when I said yes, she replied, “Well, we do have a 7 day return policy if it doesn’t come out.”

O ye of little faith!

Actually, I didn’t know if it would come out, but I figured $6 + the possibility of a return were good odds.

I dumped a little powdered oxygen bleach (I have this brand – not an affiliate link) in a bucket I keep for soaking stained stuff (great for baby/toddler stains!) and added some lukewarm water to dissolve it. Then I stuck the offending hems into the water, draped the rest of the shirt over the side of the bucket, stuck it on top of the washing machine where my kid couldn’t tip it over, and let it sit overnight.

The next morning I checked to see if the stains had disappeared – they had! – and then stuck the shirt in a regular load of wash, taking it out to hang dry as soon as the cycle stopped.

Et voilà:

IMG_20180212_113133017

No more coffee stains!

Lest you think this was a fluke, there were also the white shorts that I thrifted knowing they had period stains on them (yes, yes, you may throw up in your mouth a little if that skeeves you out). I applied a paste made of the above-mentioned oxygen bleach + water and let sit overnight, then scrubbed out with an old toothbrush and water. I did that a few times as the stain got fainter; I also let it soak just like I did this blouse and I think that worked better than the paste. Just soak/wash/air dry/repeat until the stain has faded away completely. Hanging to dry in the sun also helps.

Here they are, clean as new:

IMG_7559

I can’t say this will work on any/all stained thrift finds; I’m sure some items get donated because their previous owner has already tried EVERYTHING, to no avail. But if $6 of your money is worth the possibility of ending up with an unstained, new-to-you piece you love, give it a try. Especially if there’s a return policy. :)
What minor mishaps have you successfully fixed – and what kinds of defects are you willing to thrift?

DIY Pendant Necklace Update

A while back, I lost my original DIY pendant necklace:

IMG_3713

Sad face. I’ve lazily waited a few weeks for it to turn up, feeling no urgency since I hadn’t been wearing it much anyway. But as I started to lean more into solid tops just begging for a little pendant pick-me-up, I realized how much I had relied on this puppy. Absence makes the heart grow fonder and all that.

So I set about reconstructing it. I unfortunately had no more creamy, taupe-y pentagonal dodecahedrons (geometry term of the day!), and it turned out to be easier to leave the chain links on the metal spiral bead they were attached to, so it ended up looking quite different – but you can see where I got the inspiration:

IMG_20171126_175706250

While I had my supplies out, I also made a pendant out of some gold-tipped shell earrings I thrifted the week before.

From this…IMG_20171115_205629605

…to this:

IMG_20171122_091433_660Crystals + blush pink – is that not the most millenial piece of jewelry you’ve ever seen?


I also made another one similar to the first, but in bigger proportions:

IMG_20171126_175146642

I’ve worn each one once or twice so far; expect to see these popping up on my Instagram while I figure out which pieces go with what outfits and which I really love. (It’s a case of the “more becomes less” phenomenon also seen in my wardrobe – i.e., make a bunch of pendants and see which ones stick!)

If you’d like more detailed instructions on how to make your own pendant from thrifted parts, I documented the making of that original pendant here.  Fingers crossed I eventually find the original squirreled away in some unfolded pile of laundry!

Staging with Thrifted Decor

I mentioned in my post about our move that I’d be looking for some thrifted items to stage parts of our home as we prepared it to go on the market. Our realtor advised against staging our walk-in closet, which crushed my dreams of thrifting a chic, spare, monochromatic wardrobe just for looks. But I didn’t feel like I could walk away from the empty built-in shelves in the living room – a feeling that was part rational evaluation of how bare-cupboard it looked, and part creative stress relief during a rather intense moving process.

built ins
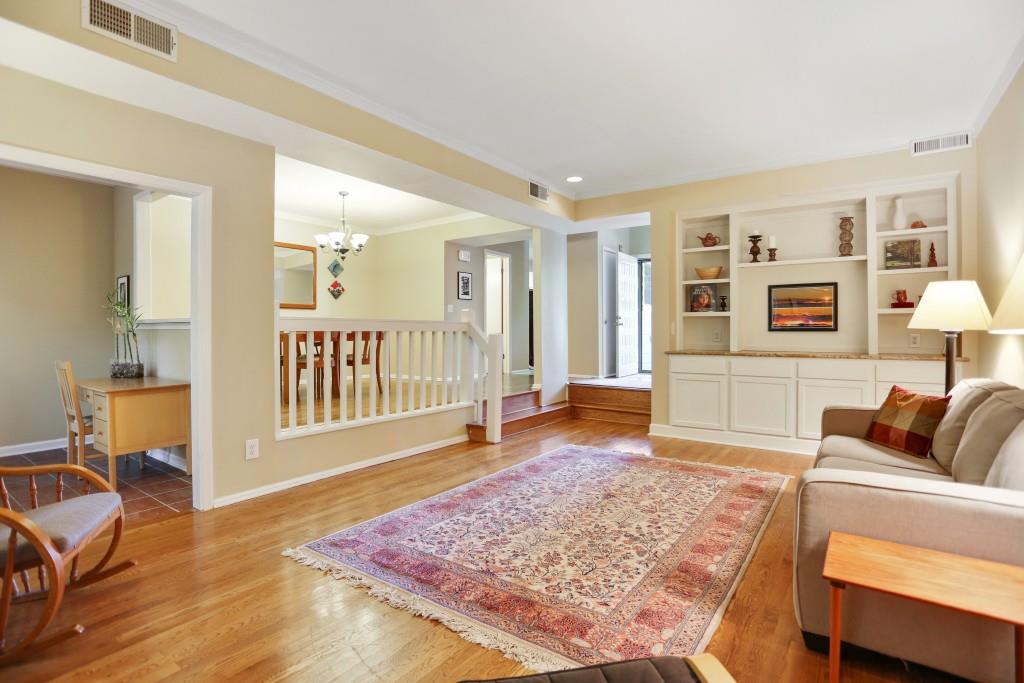
The living room with staged built-ins in the upper right

While my kitchen, office, and wardrobe are pretty heavily thrifted (that’s in ascending order of thriftedness), I haven’t thrifted a lot of decor before. Most of the things in our home are hand-me-downs (furniture), gifts, or items we’ve purchased/photos we’ve made on travels. My sister’s an artist so we have some things she’s made as well. All to say that even when I spot cute stuff in the thrift store, I rarely buy it because our home is happily full of meaningful objects we love.

Since this was a one-off fun project, though, I figured I’d give thrifting decor a try. Here’s how I approached it.

Find some inspiration. I follow Queen Thrift a Lot on Instagram; she does both style and and thrifted room makeovers, the latter professionally.  You can look specifically for thrifted decor ideas like hers, or just go nuts with interiors you like on IG or Pinterest.

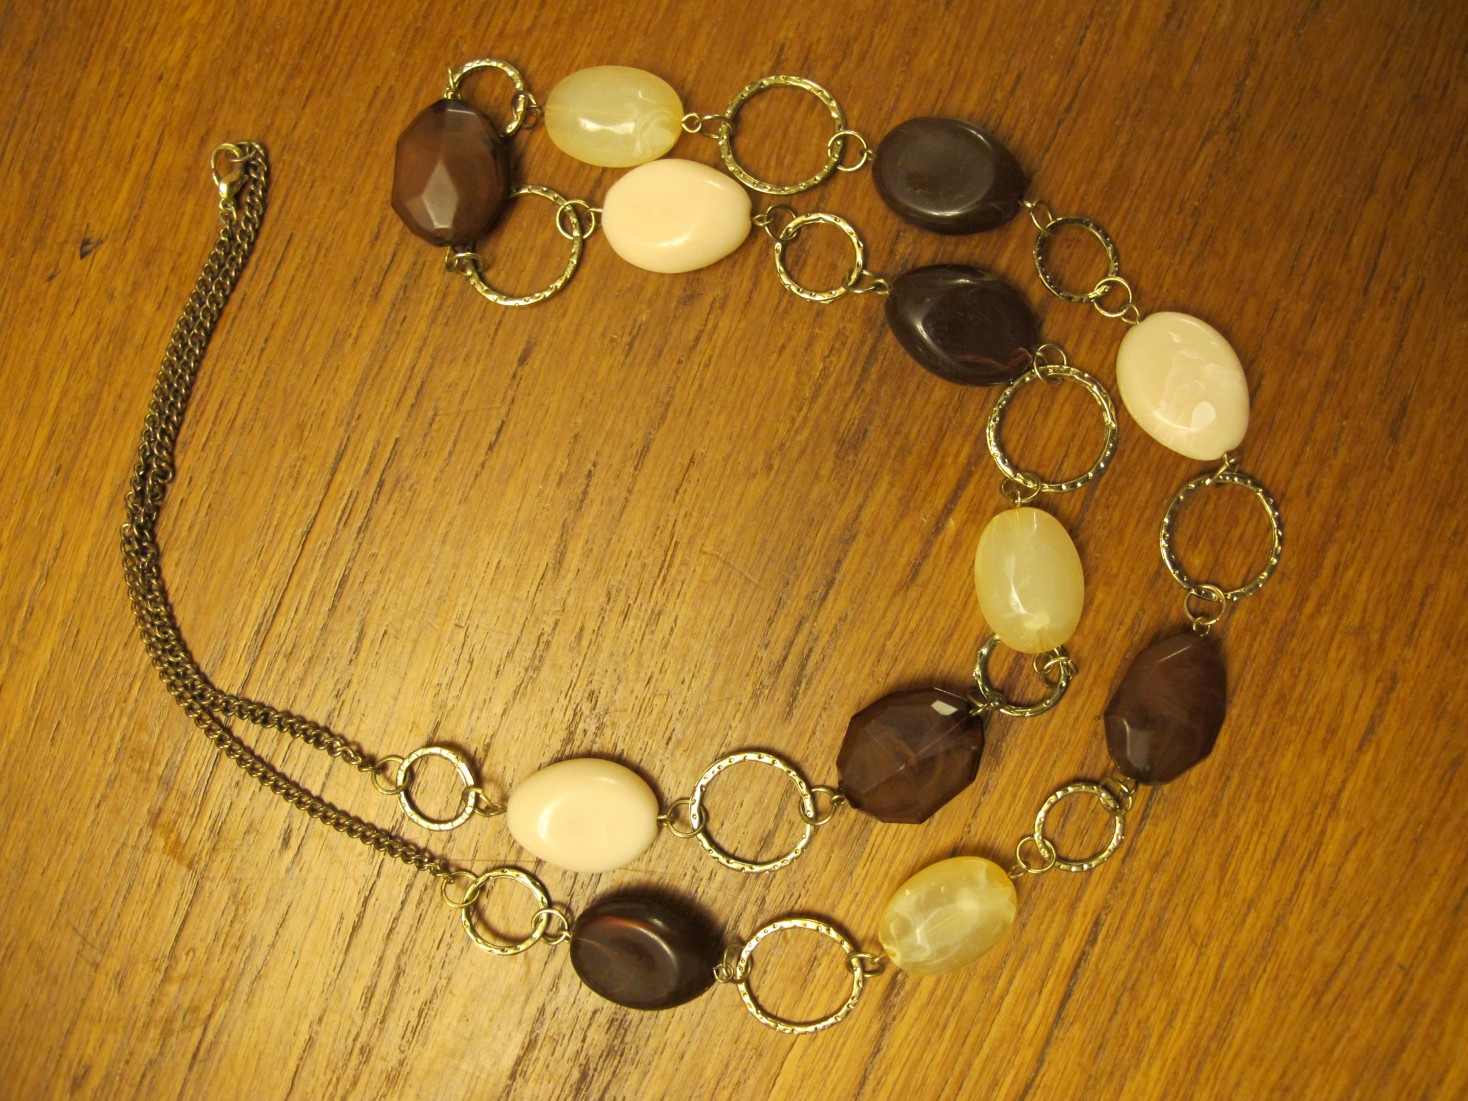
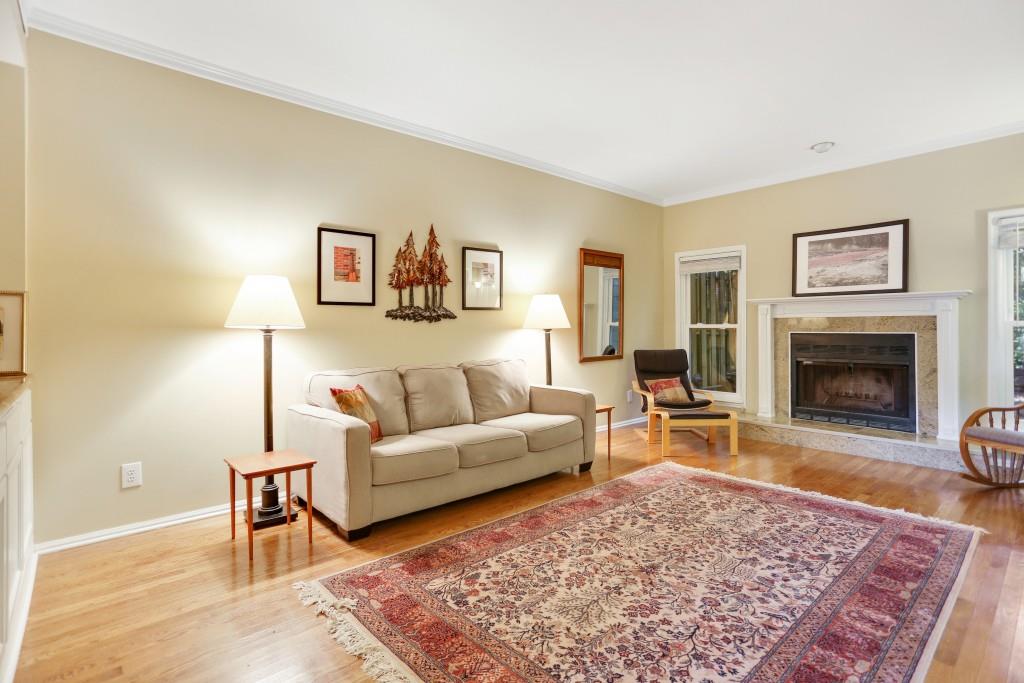
Pick a palette. Sticking to a color palette makes a mish-mash of thrift finds look like they’re meant to be together, so that’s where I started. We had already decorated the living room with colors pulled from the rug my parents had passed down to us when we moved in (thanks Mom and Dad!): light grey/taupe; a warm, muted, earthy red; white; warm wood; and some pops of black.

living room

Shop your home. What do you already have that fits the bill? This may be obvious, e.g. the key pieces from which you pulled your color palette; but you may also be able to repurpose something that would otherwise be packed up.

I had set aside two coffee table books for staging since their big squareness fit the individual cubbies well. Be prepared for horrible lighting from here on out, courtesy of my cell phone (we’d already packed our camera):

WP_20170820_09_37_29_Pro
Sharbat Gula‘s eyes go all Emperor Palpatine thanks to poor lighting and uneven discoloration. Sorry Ms. Gula!

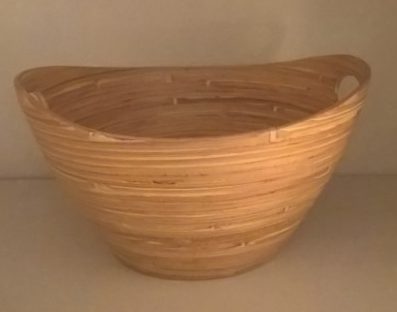
A fruit bowl from our kitchen that picked up the lighter wood colors:

WP_20170820_09_38_06_Pro

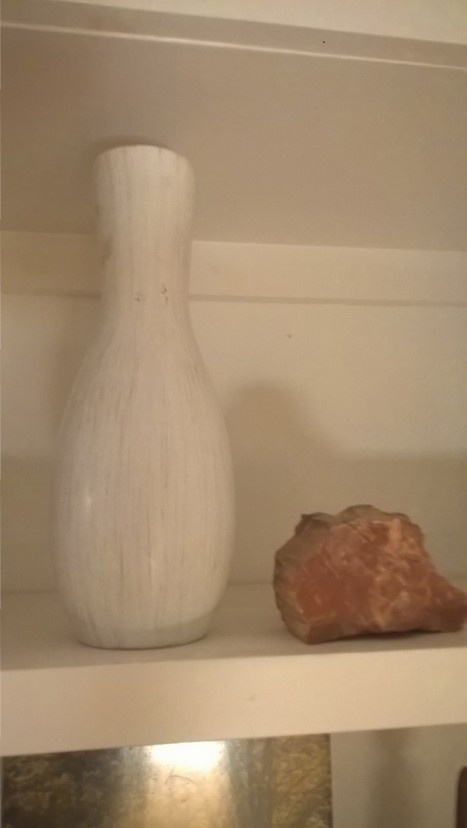
A very cool rock my sister-in-law gave my spouse… I think it’s petrified wood? The colors are spot on but the photograph is horribly blurry; look for it down below next to the white vase.

Thrift with an open mind. If you’re staging a room or a house, it doesn’t have to be your style; it just has to look pulled together and not particularly dated. Go in looking for the color and size you need; be willing to pay a few bucks for something you won’t keep forever and can redonate (ideally before you move so you don’t have to pack that extra stuff!). Even with furniture, spending $50 – $300+ to get pieces that work in the space and help them feel lived in costs a lot less than paying someone to stage your home.  And if you find something you love and will keep, all the better!

Keeping that open mindset at the fore, here’s what I found:

WP_20170820_09_39_03_Pro WP_20170820_09_38_35_Pro

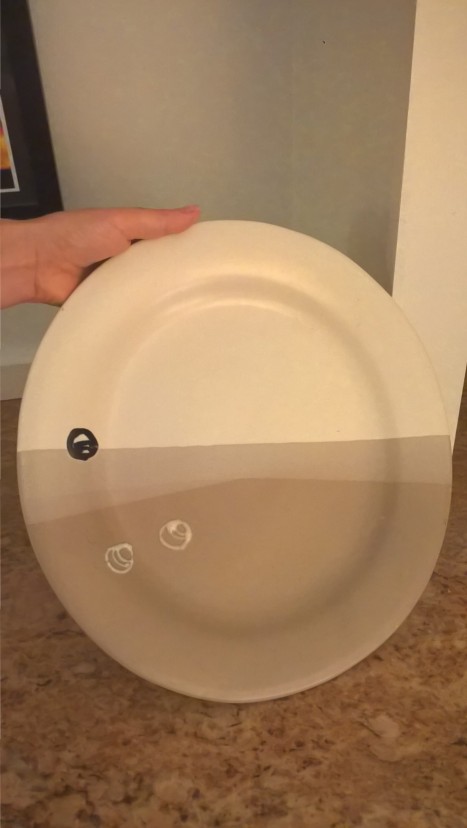
I love the minimalist palette and design on this plate; it reminds me of some desert-made art in my childhood home. Decorative plates make zero sense to me (why not eat off of it, or use the space to display something more interesting/your books?), otherwise this might have made the “keep” list.

Likewise, I could see keeping the white/buff streaked vase in another style life, but it was filled with styrofoam (why??) so back it will go. It looked great next to the petrified wood, though.

WP_20170820_09_38_14_Pro

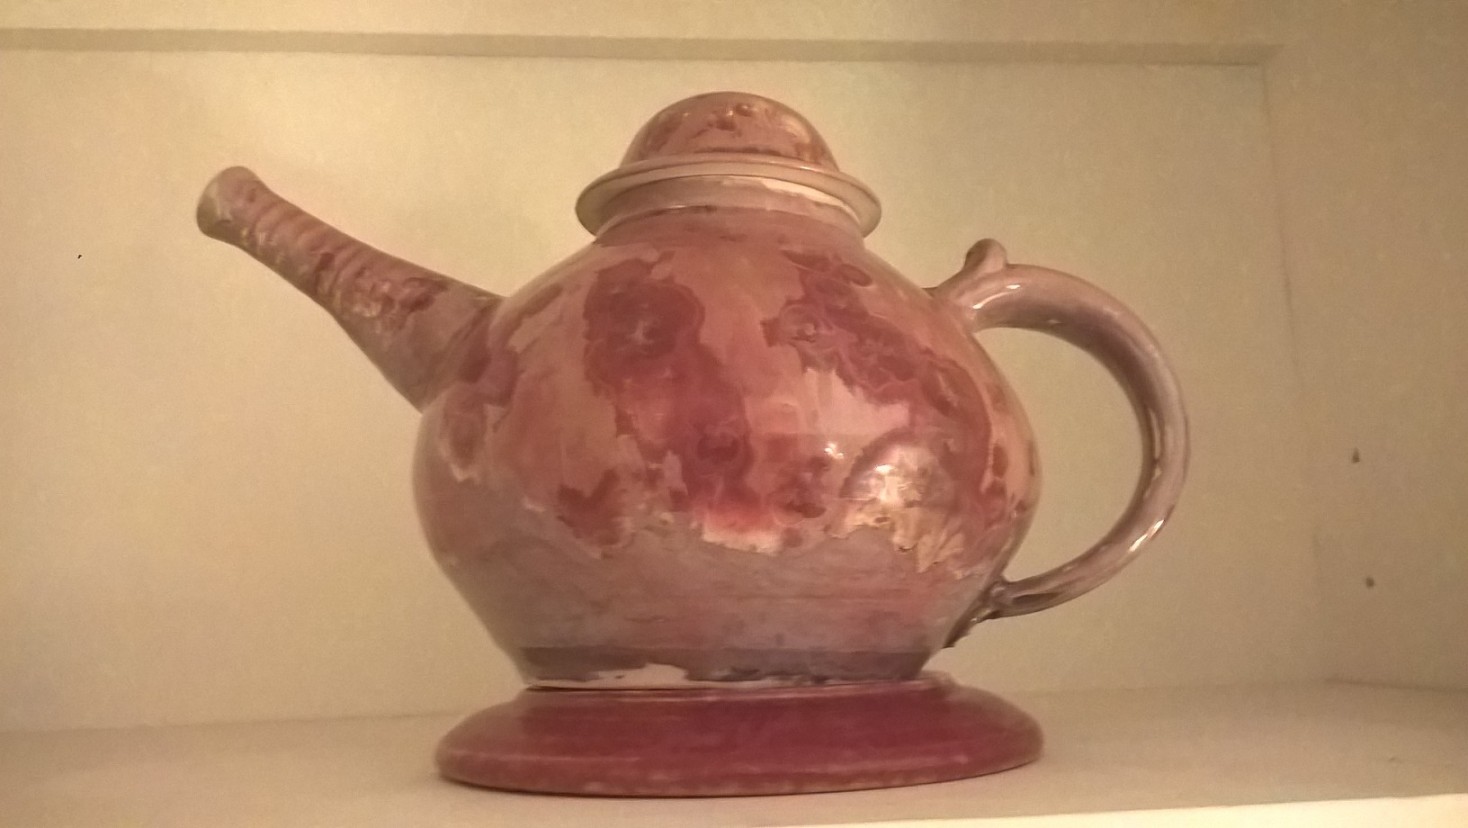
The picture does not do justice to this amazing crystalline glaze teapot. I flipped a small ceramic plate in the same color family that we already had upside down to boost it up a little higher so it was more visible from the floor. The plate will likely get donated when we clear everything out; the teapot was an unexpected coup de coeur and I’ve talked myself into finding a space for a teapot we’ll never use (since we never use teapots and I have no idea if it’s food safe).

WP_20170820_09_38_42_Pro WP_20170820_09_37_48_Pro

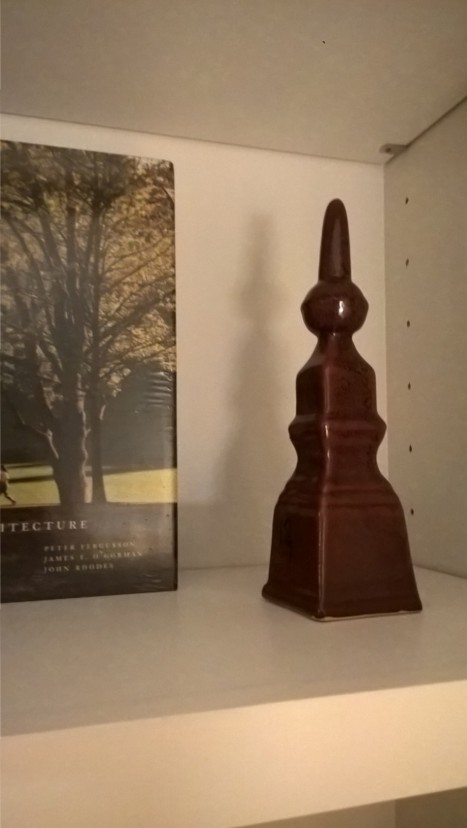
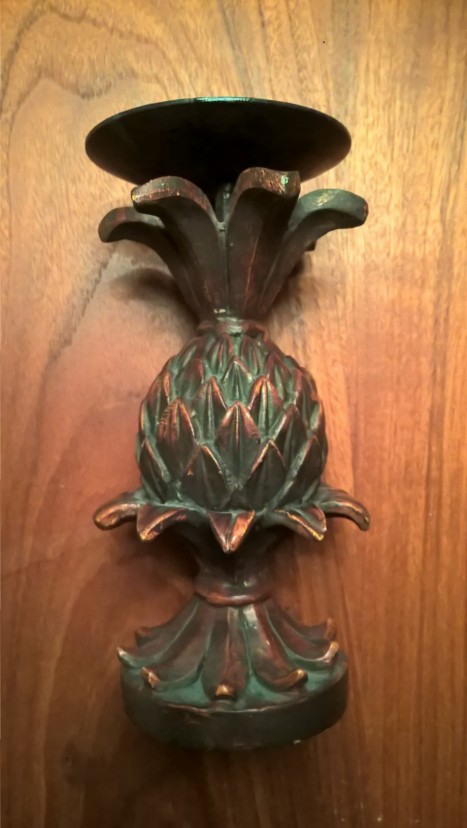
I have no idea what the thing on the left is but it was the right color (next to it is our other coffee table book). The pineapple candle holder on the right – much more red in real life – is too baroque for my taste, but it had a matching, larger candle pedestal (below) and I figured putting them in two different spots would help tie in all the disparate pieces.

WP_20170820_09_38_47_Pro

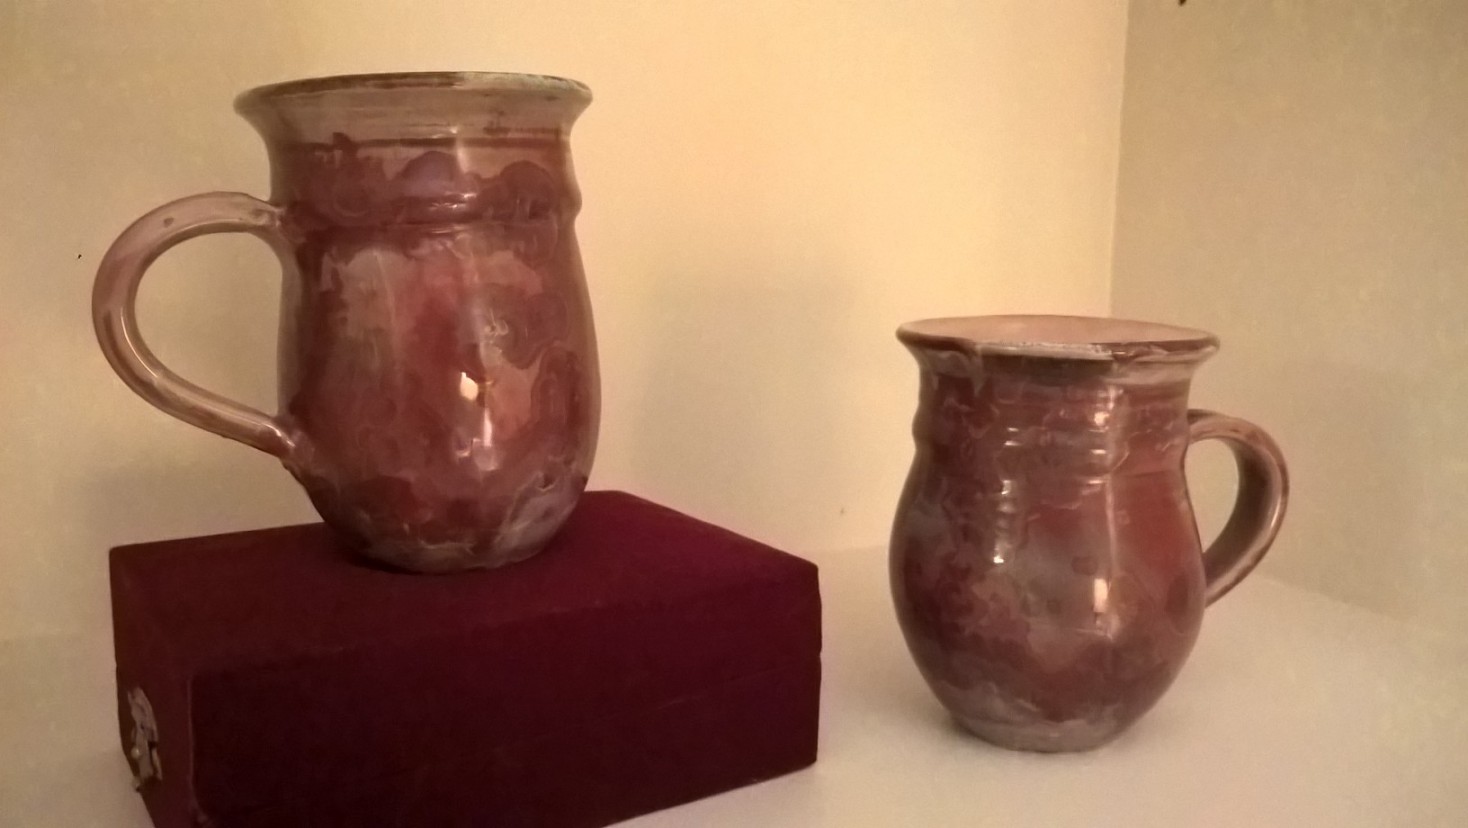
The matching mugs for the pot! Oh happy day. I used a velvet keepsake box we already had to boost one up both for a little visual interest and to take up some more vertical space since the mugs were on the short side.

WP_20170820_09_38_20_Pro WP_20170820_09_38_26_Pro

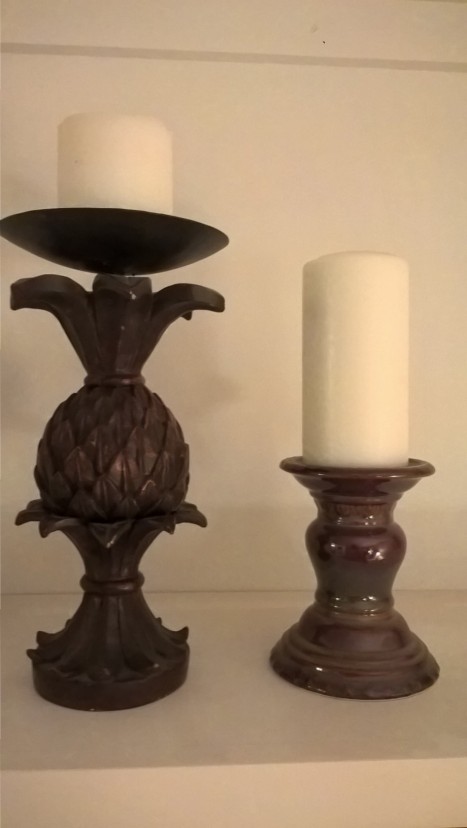
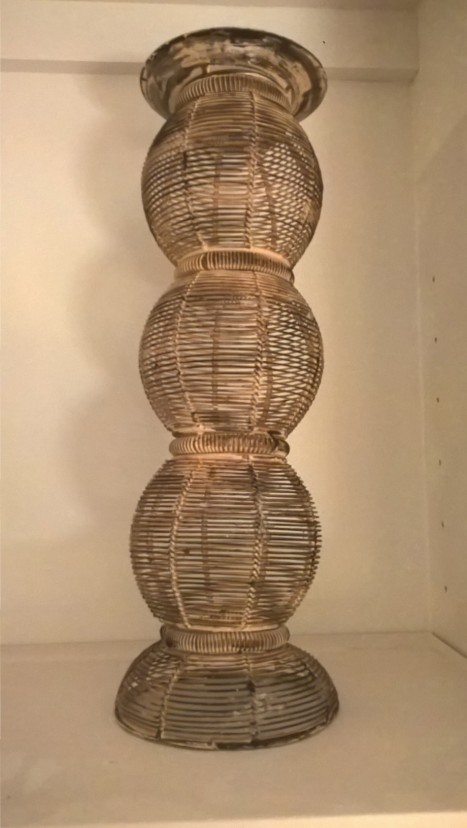
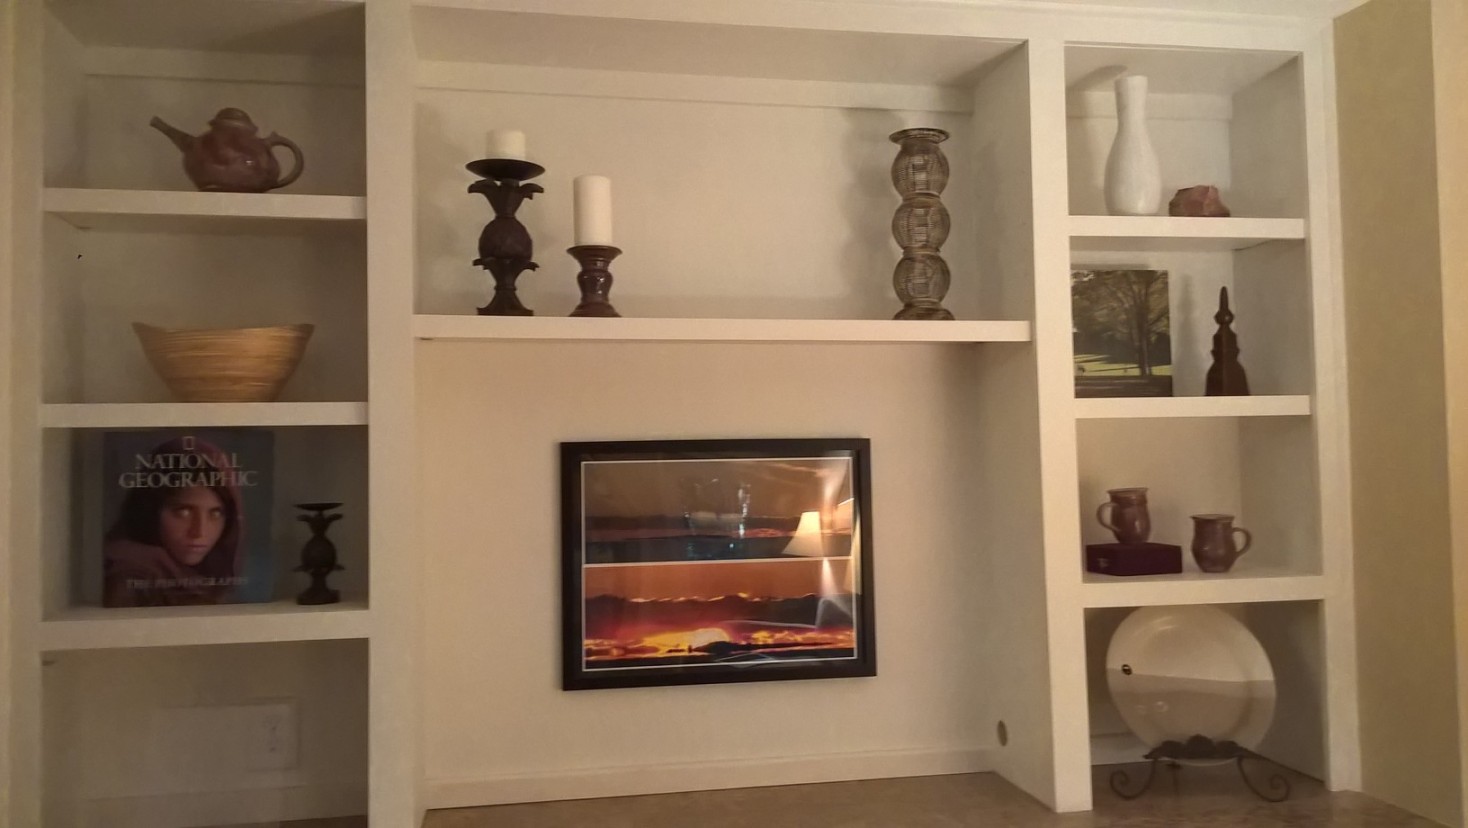
The larger pineapple, another candle pedestal, and what we dubbed the Leaning Tower of Bird Cage. I have no idea what that thing is but it was the right height for the taller space in the middle.

Play with it. Don’t be afraid to rearrange, sleep on it, and rearrange it again. It took me three or four tries to get to a distribution of heights and colors I liked. Pinterest/IG can be very helpful here as well in training your eye on how different colors/sizes/styles can go together.

Here’s how it all looked together, with sunset photos my father-in-law took in the center:

WP_20170820_09_39_52_Pro

The lower left cubby was left open for real estate brochures.

Once again, from far away but with better lighting:

built ins

Total cost was under $40. It was a bit more than I wanted to spend, but for a project I enjoyed and a beautiful teapot/mugs I’ll keep, it was worth it.

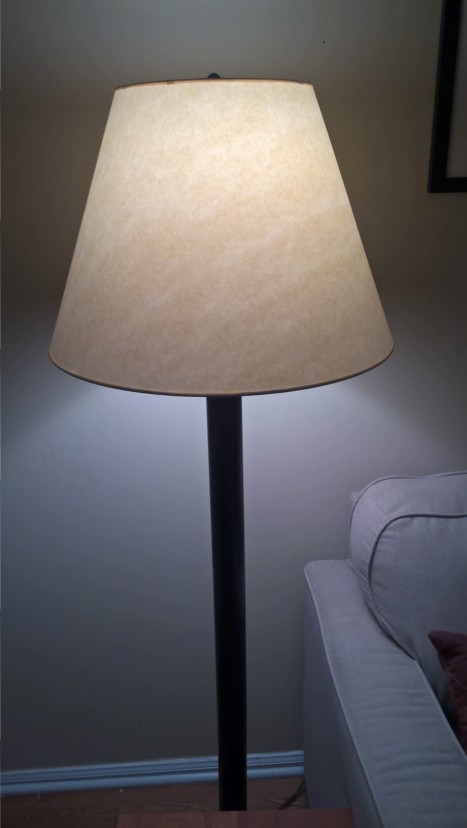
Look for extras. We thrifted neutral-colored lamp shades to replace the dark amber ones the lamps came with when friends, moving four years ago, gave us theirs (thanks Les & Lauren!). Our space needed light and for $4 a piece, new with plastic wrap still on, they did the trick very nicely:

WP_20170820_09_41_16_Pro

You can see them in action again below, where you’ll also notice our mantelpiece art:

living room

I diligently scoured my area Goodwills for art big enough to fill that space and with the right hues, but came up empty handed. So the week before our house went on the market, I picked out a photo of wildflowers I’d taken at Arabia Mountain National Heritage Area with all the colors from our living room in it, had it blown up at Costco for $10, bought a frame at IKEA for $20, and voilà, we had art we loved that played well with our staging:

imgsvr

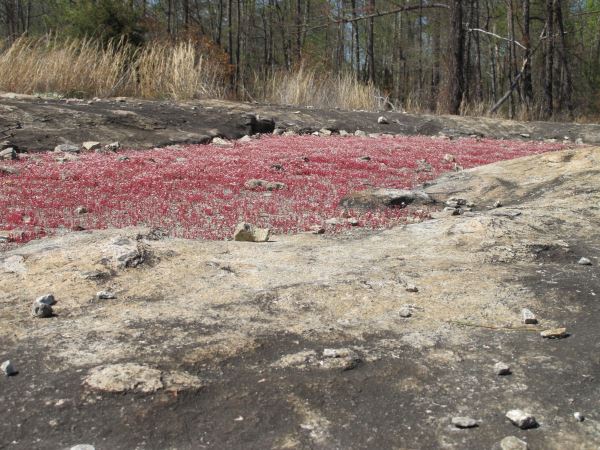
Who knows if we’ll keep that same print in our new space; our color scheme may very well be different. But for $10 a print I’m going to have a lot of fun choosing a replacement from among our travel photos! (PS if you are near Atlanta you should definitely visit Arabia Mountain, particularly in early spring – the wildflowers growing on bare rock are otherworldly.)


Have you ever staged your home? Did you do it yourself or pay someone to do it? Do you thrift decor/homewares? If so, what’s been your favorite find? Comment to share!

Vintage Bracelet Makeover

Last Saturday I finally got to visit Chalice Thrift at the First Christian Church in Decatur. (Church nerd note: they’re Disciples of Christ, which is the cousin to my denomination, and they do really rad justice and service work with the proceeds from the thrift store.)

They’ve been closed the last 3 times I’ve been by, so I was thrilled to have a look inside.  Plus they had Danish butter cookies and lemonade for all, and Danish butter cookies are the way to my heart (especially the kind with crystallized sugar on top).

WP_20170527_10_32_24_Pro
Victory is mine.

They also grow blackberries which made my child happy (well, that and the cookies. And their lovely clean bathroom they let her use):

WP_20170527_10_32_30_Pro

Inside the shop was set up like a boutique, with different rooms for women’s, men’s, kids, housewares, books (a veritable library!), etc.:

WP_20170527_10_36_40_Pro

I wanted to get back to park time* with my family, so I made a pretty quick sweep. (*Atlantans with small people should check out the Decatur Toy Park. Sponsored by this same church, it’s basically a fenced-in park filled with larger-sized toys, particularly wheeled ones, donated for all to use. There are also swings, small slides, and a mini free library, and it’s across the street from the thrift store. It’s also just down the block from Dancing Goats if your toddler woke you up earlier than nature intended and you need some coffee. Win-win.)

During my sweep, this vintage earring/bracelet combo immediately caught my eye:

WP_20170527_10_45_29_Pro

I’ve long been a fan of vintage costume jewelry for the sheer chutzpah it brings to an outfit. My grandma had a lot of great pieces I’ve enjoyed wearing over the years, although I’ve scaled back from wearing complete earring/necklace matching sets in the same outfit.

So I wasn’t sure what I would do with this set, particularly since I prefer cuff bracelets to linked ones. But I couldn’t resist the palm frond motif or the golden color, halfway between taupe and caramel, that would go with so much of my wardrobe. It felt like a fresh, subtle take on the palm frond trend that’s been going strong the last year or two:

WP_20170527_10_45_35_Pro
Mmm, that vintage patina…

I bought it without a plan and wondered if I’d basically just donated $4 to Chalice Thrift (not a bad thing, but I like to spend thrift money on things I’ll actually, you know, wear.)

Later that day it occurred to me that I could make this bracelet into a necklace by removing the clasp on one side and attaching chain to both ends.  A quick perusal of my miscellaneous jewelry-making bits confirmed that I didn’t have enough chain (or the right color) for what I had in mind.

So it was time for a trip to the Goodwill to hunt for parts. (We also took the opportunity to teach our daughter how to wisely spend her birthday money; $8 goes a long way in the kids’ section of a thrift store. I’m proud to say that after playing with a bunch of cheap toys she bought one book and kept the rest of her moolah for another day/charity donation.)

In the jewelry section I found this number:

WP_20170529_14_02_57_Pro

(My friend pointed out that I could’ve gone to Michael’s and maybe spent less buying new chain, but I’d rather buy secondhand and experience the thrill of the hunt. Plus this was only $4 and I’m getting a lot of other beads/jewelry bits out of it, including some to make earrings for this same friend. Win-win again!)

Using jewelry pliers I took out the chain sections, including the short braided section (on the left middle in the photo above), and left the lobster claw clasp where it was.  I attached the braided chain to one side of the single chain, then took two of the necklace’s jump rings (small metal circles used to connect chain to beads/hang pendants) and used them to attach the chain pieces to the bars at either end of the former bracelet. You can see the jump rings and the braided chain section up close here:

WP_20170529_14_16_53_Pro

I like how the braided part adds a little asymmetrical interest.

This shot gives a better sense of where the necklace falls – I can adjust the length from almost choker down to this “bib” size simply by attaching the lobster claw to any of the chain links:

WP_20170529_14_16_57_Pro

Here’s another few shots of my new necklace in action from Instagram – when I make “new” jewelry I’m excited about, I tend to wear the heck out of it:

A post shared by LeahLW (@thriftshopchic) on

A post shared by LeahLW (@thriftshopchic) on

What do y’all think of my $8 vintage bracelet makeover?  Have you Atlantans ever visited Chalice Thrift?  Scroll down to comment!

Friday ReBlog: No Sew DIY Ugly Christmas Sweater Arm Warmers

Yes this is a day early.  If you get inspired by these awesome arm warmers, I want you to be able to go get supplies TODAY and make them TOMORROW in time for any last-minute Christmas shenanigans.  Or, you know, they’d make a nice DIY Saturday AM to cozy up your arms for Christmas Eve.  Your call.

My friend Tracy is an avid thrifter (surprised?) but also much more of a DIY badass than I am.  We went to a holiday party at the house of a mutual friend last weekend and instead of merely thrifting an ugly Christmas sweater to wear (or completely missing that part of the invitation and showing up in regular clothes…whoops, that was me), she thrifted two ugly Christmas sweaters and MADE ARM WARMERS OUT OF THEM.  WITH SAFETY PINS.

It’s like an ugly Christmas sweater had little arm-warming babies with a punk rocker.  Check this out:  v__d4d6

She basically measured the width of her forearm, doubled it, and cut a piece that size from the parts of each sweater she liked.  Then she cut thumb holes (the best) and instead of sewing, she thought “Why not use this pile of safety pins I have lying around?”  Why not, indeed.

v__0a70

If you were looking to make them last awhile, you could sew instead of pinning and reinforce the thumb holes with hand stitching.  BAM.

v__a043

If you and yours are looking for an easy, thriftable, warm, no-sew, and (most importantly) rad Christmas project, get amongst it.  Thanks, Tracy, for sharing!

What are your favorite holiday-related things to thrift?  Scroll down to comment!


DIY: In Which I Paint More Shoes

Blog readers who’ve been around since last summer may recall the teak Trotters flats, courtesy of my mother-in-law, which I stripped and repainted champagne.  Well that lovely woman’s feet are the gift that keeps on giving, because as they spread out a bit, she can no longer fit in narrow shoes and she passes them on to moi!

Thus I was the lucky recipient of these Sebago boat shoes, again in a dark tan color:

img_4474

They were practically brand new, and if I had a lot of brown (any brown?) in my wardrobe I would have left ’em as is.  But since my neutral colors tend towards grey and navy, I decided to redo these in a nice soft grey.

I followed the same steps as in my first shoe repainting foray, taking my own advice to use a higher quality brush this time around:

img_4493


First I took the raw hide laces out of the first few holes so I’d have easy access to the tongue and some of the side parts.  I accidentally went one hole too far – I’m going to have to use a needle and string to rethread that puppy because it was originally enclosed between two layers of the shoe in an inaccessible area.  Pro tip if you’re working with shoes like this: check how far you can delace BEFORE yanking out the laces.

Then I got out my bottle of Angelus leather preparer and deglazer, left over from last time:

img_4475

I’d say one bottle covers two pairs of shoes (flats, that is – size 10).

I used an old toothbrush to scrub off the original color.  Similarly to nail polish remover, once your chosen implement (paper towels, rag, toothbrush) has saturated with color, it won’t remove any more pigment.  This means I did a lot of little dips into the deglazer followed by good scrubbing in a small area, and then wiped the removed color on an old rag:

img_4491

It was pretty hard to tell the difference between areas where color remained vs. areas that had been saturated by the leather deglazer.  Eventually I figured out that if I wasn’t sure, I could just brush the area and wipe it on the rag; if color came off onto the rag, there was still original pigment there and I needed to keep working.  It was pretty much impossible to keep the original color from staining the white contrast stitching, and I knew it would be impossible to keep from painting it later, so I decided early on that the contrast would just go grey like the rest of the shoe.

Color starting to come off – the waterproof coating took some elbow grease to remove.  You can also see how the contrast stitching is starting to dye:

img_4477

Color removed on the right, not on the left: img_4483


After I was satisfied that I had gotten most of the color off, I let them dry in the sun for about 20 minutes:

img_4485 img_4484

Next, the new color!

As with last time, with each new dip in the paint I began with the stitching, raw edges, or seams that would need a lot of paint to saturate, then spread the excess out over smoother surfaces.  Direction of the brushstrokes didn’t seem to matter as much this time; after one coat I couldn’t tell which way I had painted.  This led me to let my toddler help me paint the second coat on one of the shoes, a move my spouse called “brave”; but honestly, look for yourself at the end – can YOU tell the difference?  (I will have to use a little deglazer to get some overenthusiastic brush marks off the sole…)

I also decided to paint the grommets because it was too dang hard to paint super carefully around them without getting paint on them as well.  If I had more patience and had used a fine angle brush, I probably could have made it work.

I chose Angelus leather paint in Cement/Grey White, hoping for a muted grey that would jive with my wardrobe palette.  Here’s how it looks on the first coat:

img_4486 img_4487

A little more blue than I would like, but I was hoping that wouldn’t be obvious after a second coat.

Between coats I let dry in the sun for an hour or so.  Did I mention how lovely it was to do this outside in the warm October sun?  (But watch out for falling leaves as your paint dries.)

And here’s the final product after the second/last coat of paint: what do you think?  I’m excited to wear them after a full 24 hours of drying (just to be sure) and a rethreading of that one lace.

img_4489

img_4494

This project, by the way, cost me about $3 (paint) and would cost you about $10 if you had to buy the deglazer and brush as well.  Not bad for a weekend afternoon!


Shaving My Blazers and Other Fall Wardrobe Maintenance

Apologies for the incomplete post last night. I discovered that blogging while supervising a painting toddler results in posts with pictures missing and black paint (thankfully washable) splattered all over the dining room wall.

It’s actually a bit cool in the mornings now in Atlanta!  I still couldn’t talk myself into truly needing a blazer, but that weather will be here soon.  In preparation, I took care of some pilling on a couple of cool weather blazers.  And my winter weather pants came back from the tailor!  (I realize in looking back on my preview post that it may not have been clear that I was having the legs tapered on the pants on hangers – I was on my way out the door for some much needed vacation. Also, take a look at the updated version to see the items that did not make it into last week’s wardrobe preview due to technical difficulties.)

And now, shaving my blazers. Continue reading “Shaving My Blazers and Other Fall Wardrobe Maintenance”

What I Wore: Office Sick Day

Yesterday I had a head cold from Hades. (I still have it, but now it’s from, say, Hoboken.)

I spent a good 15 minutes in bed trying decide whether to go to work or stay home.

But yesterday was my boss’ first day back after 4 weeks out of town. And a new program year is breathing down our necks. And I had 3 meetings scheduled. And someone had to drive the kiddo to daycare regardless.

So I went to work, but in the most comfortable work-appropriate clothing possible, which I had most fortuitously thrifted over the weekend due to my inability to say no to comfortable dresses and stripes (and this shade of blue!):

IMG_3910

Continue reading “What I Wore: Office Sick Day”

The Lazy Person’s Guide to Wrangling Pant Hems

What do you do when your pant hems fail you?  Maybe they’re too long, or the thread comes undone leaving you with a sloppy one-sided pant mess.

If you are a whiz with a sewing machine, just ignore this.

But if, like me, you can barely remember how to thread one (Ms. Drust, my Home Ec teacher, is pulling out her hair somewhere), this crib sheet is for you.

Obviously, if you have time you should take ’em to your tailor.  If your tailor is kind of out of your way, like mine is, or you keep forgetting to put your pants in the car so you can actually bring them to tailor (ahem), I’ve got a few options for ya. Continue reading “The Lazy Person’s Guide to Wrangling Pant Hems”